Welcome
Thank you for installing Gift Reggie by Modd Apps! This guide will walk you through the simple steps to add registry and wishlist functionality to your Shopify store. By the end of this setup, your customers will be able to add products to their registries and wishlists directly from your product pages.
Prerequisites
Before you begin, please ensure that:
- Gift Reggie by Modd apps is installed on your Shopify store
- You have access to your Shopify admin panel
Setup Instructions
First, from Gift Reggie's help page, please select the theme in which you want to set up Gift Reggie
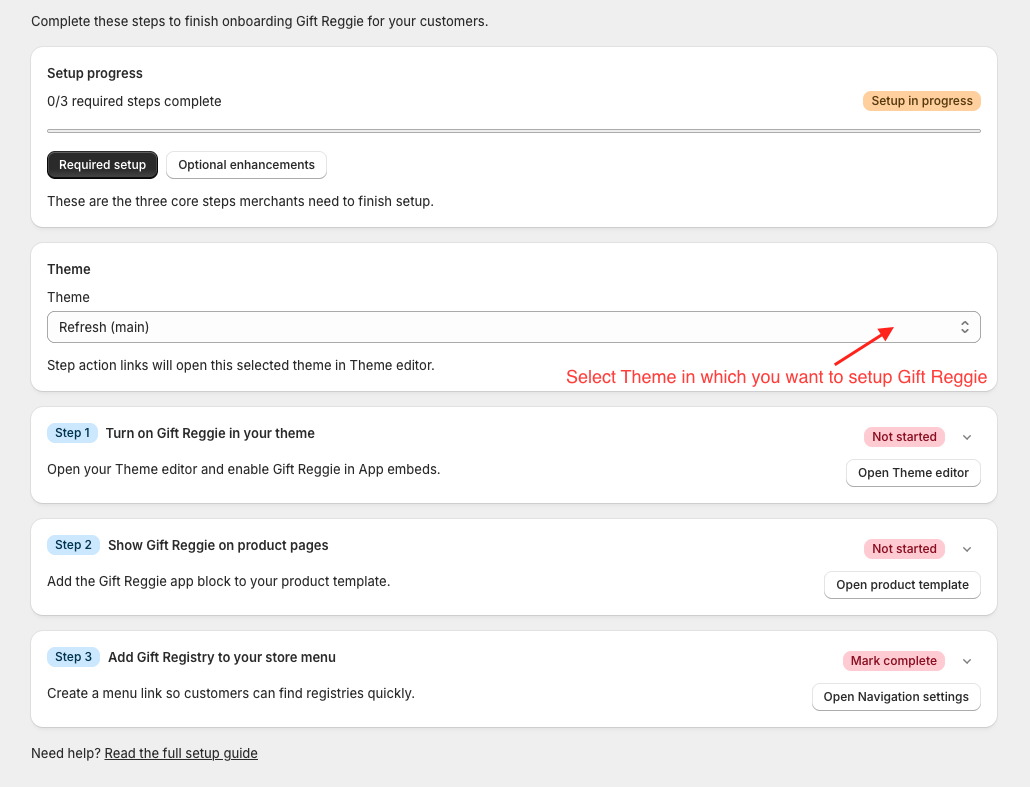
Step 1: Turn on Gift Reggie In Your Theme
- Please click on the "Open Theme Editor" button under step 1. This will enable the Gift Reggie on your store.
- Click on the save button (Top Right Corner).
Steps to do it manually
Step 1: Access the Theme Customizer
- Log in to your Shopify admin panel.
- From the left sidebar, go to Online Store.
- Click Themes.
- Locate your active theme and click Edit Theme.
Step 2: Enable the App Embed
- In the theme editor, click the App embeds icon.
- Locate Registry and Wishlist by Gift Reggie: Gift Registry.
- Turn the toggle ON.
This enables Gift Reggie on your storefront.
Step 2: Show Gift Reggie Buttons on product pages
- Please click on the "Open Product Template" button under step 2. This will add the Gift Reggie buttons to your product pages.
- You can drag the Wishlist/Registry buttons block to add the buttons at your desired location. Usually, under the buy buttons is the recommended place.
- Click on the save button (Top Right Corner).
Please note that this will add buttons to your "Default Product" template. If you have multiple product templates, you will have to add the buttons manually to them.
Steps to add Gift Reggie buttons manually
Step 1: Navigate to Product Template
- In the Top menu, click on Sections (looks like a burger icon).
- At the top of the page, click the page dropdown (this usually shows Home page).
- Go to Products → Default product.
This opens the product page template, where you can add the registry and wishlist buttons.
Step 2: Locate the Product Information section
- In the left sidebar, find Default product and its expandable sections.
- Look for the Template section.
- Click Product information to expand it.
You’ll now see the elements that make up your product page, such as Text, Title, Price, and Buy buttons.
Step 3: Add the Wishlist/Registry Buttons
- Scroll through the Product information elements until you find Buy buttons.
- Right-click the Buy buttons element.
- Select Add block after. You can also add the block in another location if preferred.
- In the pop-up window, click the Apps tab.
- Select Wishlist/Registry Buttons from Gift Reggie: Gift Registry.
The registry and wishlist buttons will now appear on your product page, usually below the Add to cart and Buy it now buttons.
Step 4: Save your changes
- Click the Save button in the top-right corner of the theme editor.
- Your changes will be published to your live store.
STILL UNABLE TO ADD BUTTONS USING THE ABOVE STEPS, OR UNABLE TO ADD BUTTONS AT THE DESIRED LOCATION?
It might be possible that your product page doesn't look as shown in the guide, or you are unable to add buttons at your desired location.
Please follow the guide below to use Advanced Settings in the App embeds to add buttons.
Gift Reggie- Advanced Setting - Button Location Override
Step 3: Add Gift Registry to your store menu
- Please click on the "Open Navigation Settings" button under step 3, and this will take you to your store's menu settings. Or, from your Shopify admin, navigate to Content → Menus
- Click on the menu where you want to add Gift Reggie links (typically the Main menu)
- Click Add menu item
- Add the following links as needed:
Available Gift Reggie Links:
-
Gift Registry (Landing Page)
- Name: Gift Registry
- Link:
/apps/giftregistry - Purpose: Main landing page for your gift registry feature
-
Find a Registry (Search Page)
- Name: Find a Registry
- Link:
/apps/giftregistry/find - Purpose: Allows customers to search for existing registries
-
Create a Registry (Creation Page)
- Name: Create Registry
- Link:
/apps/giftregistry/create - Purpose: Allows customers to create their own registry
-
Manage Registry (Management Page)
- Name: My Registry
- Link:
/apps/giftregistry/manage - Purpose: Allows customers to manage their registry items
-
My Wishlist (Wishlist Page)
- Name: My Wishlist
- Link:
/apps/giftregistry/wishlist - Purpose: Allows customers to manage their wishlist (if wishlist feature is enabled)
- For each link you want to add:
- Enter the Name (how it will appear in your menu)
- Paste the Link exactly as shown above
- Click Add
- Arrange the menu items in your preferred order by dragging and dropping
- Click the Save menu to publish your changes
Recommended Menu Structure:
For the best customer experience, consider adding these links in the following order:
- Gift Registry (main landing page)
- Find a Registry
- Create Registry
- My Registry
- My Wishlist
Congratulations! Gift Reggie is now successfully set up on your store with easy navigation access for your customers.
Need to Customize Gift Reggie Buttons?
Please follow the setup guide below to access more customization options in the app embeds.
Gift Reggie App Embed Setting For Buttons